Wednesday, September 2, 2009

Neither here nor there - with an egg on top

In Pierre Koralnik's 1967 telemusical Anna, there's this great scene where Anna Karina - in the throes of an intense crush - is just fluffing about at home. Those who've seen this great film will know that she's about to break into one the highlight songs of the movie, 'Rollergirl'. But before she does, she dilly-dallies around her apartment for a bit in thigh-high striped socks. For the briefest moment, she decides to cook an egg: she cracks into into the little pan, stirs it with a chopstick or something, but then just gives up and walks away. She doesn't know what she wants - and that's exactly how I feel at the moment.


Which, actually, has led me to eating a lot of eggs. Or things with eggs on top. So while I don't have a recipe (still) for you, I have a list of things which are made even more excellent with an egg on top. Like plain risotto - especially if you fry some sage leaves until they're crispy and scatter them over.


Or put one on top of some ratatouille, or sauteed cavelo nero with a bit of garlic. Or in the middle of some sauteed green peas and bits of chorizo to make Tessa Kiros's Portuguese eggs - or set a perfectly poached one on top of a handful of still slightly crisp asparagus and shave some parmesan over the top. Or just put one on a plate, splash it with hot sauce and eat it with bread. If you didn't eat the egg - if you just smoked a cigarette instead - you'd probably end up looking a bit more like Anna Karina. But for all those times when you're sitting around in your stripy socks on a sunny morning, feeling neither here nor there - an egg is almost perfect.

Friday, July 10, 2009

Scallops with cauliflower purée, fino and gremolata

There’s been quite a bit of talk recently (like, three weeks ago when I started writing this post!) about the television event that is Masterchef and how it might be changing the way Australians are cooking at home. I’ve joked with friends about the new collective silence that can now be observed on the suburban streets of Melbourne at around 7pm, as families sit around waiting for their lamb roast to ‘rest’. This isn’t a bad thing: in fact, it is quite wonderful.


On a personal level, three important things have happened since I’ve become hooked on the program: 1) I have started to shop differently (and less expensively) at the markets: rather than buying everything I could possibly feel like eating in a week, I buy a couple of things that look wonderful, fresh and inspirational and think hard about how to showcase their quality; 2) I don’t worry as much about how things might (not) work out. I just go for it and if the worst thing that happens is the steak is medium and not medium-rare, I know that the heavens won’t fall and that it happens even to experienced cooks and chefs; 3) I have developed an intellectual crush on a giant Englishman who wears skinny white pants and a cravat every day.


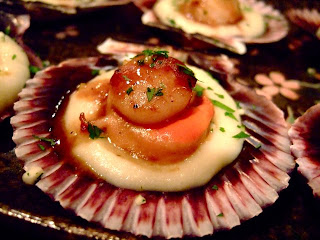
This scallop entrée is something I made up the other day when scallops looked incredible at the market and I’d promised myself I’d use the cauliflower that was about to go limp in the fridge. They looked so impressive and are an easy starter for when you have people round. The little babies are seared in browned butter until just done and are then finished with a splash of Spanish fino sherry that mixes with the butter to become a sweet, rich sauce. They sit on the shell upon a pillow of velvety cauliflower purée and are finished with a sprinkle of finely chopped parsley, lemon rind and garlic. A bit of a Spanish/Italian hybrid – I realise – but it was delicious. It looked liked something from Masterchef and reminded me that sometimes the best dishes are the ones you discover without a recipe. So in the spirit of this, I am giving only a simple description of how this came about, instead of a detailed recipe.

Some notes: If you can't get fresh scallops on the shell, just get loose ones and serve a few on a nice plate on top of the purée. The fresh ones are sweeter! I like mine with roe attached but you could get the ones without. Spanish fino is a dry sherry, very much unlike what your grandmother used to drink of an evening. It is well worth seeking out! You can read more about it here.

1. For the cauliflower purée, make a velouté soup kind of a thing. Melt a nice knob of butter and stir in a tablespoon or so of flour, mixing to make a roux. When it looks ready (be careful not to burn!), add enough warm vegetable stock to cook a third or a half cauliflower cut into pieces. You don’t want a thick sauce to cook the vegetable in, just something with a bit of body that will make a nice smooth purée. When the cauliflower is tender, whiz the whole lot up in a blender or food processor until velvety and smooth. Season to taste and keep warm.

2. For the gremolata, finely, finely chop some fresh parsley, lemon rind and a garlic clove. The idea is for this to be delicate on the scallop – so no chunks of garlic! Set aside.

3. For scallops, melt another little knob of butter on medium heat in a pan. Season the scallops carefully with salt and pepper on each side. When the pan looks nice and hot, pop the scallops in and be prepared to start turning! They don’t take very long – only 30 seconds or so on each side. When done, transfer to a plate and tent with foil to keep warm. Return the pan to the heat and add a good glug of fino sherry – it should bubble up and smell amazing. Swirl the pan to amalgamate, or stir with a wooden spoon. – there won’t be heaps of sauce, but just enough to drizzle over the scallops. To serve top cauliflower purée with scallops and spoon over the juices in the pan. Sprinkle the tops scantly with gremolata. Time’s up! But you’re plated and done.

Saturday, June 13, 2009

Beetroot & Goat Cheese Risotto

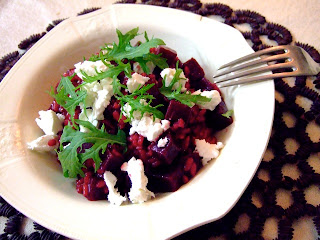
It's been so long since I posted that I wish I had something more spectacular to offer than this risotto. Because it was nice - and actually very much what I felt like eating at the time - but not mind-blowing. Especially seeing as I was watching Masterchef while stirring and they were teaching the contestants how to smoke beetroot. Suddenly this felt a bit average.


But it did look very pretty. And it was very comforting thing to eat on a cold evening, away from home. And you can even make it in a severely handicapped beach-house kitchen. You can find the recipe for it here. I won't copy it out for you, because I hardly changed a thing. Except I'd recommend replacing the tinned beetroot with fresh cooked, of course (peel and cut into bite sized pieces and cook until tender in a little water and a splash of balsamic vinegar). And I was without walnuts, but I think they would have been good.

Because there's such a small amount of red wine in this, I'd recommend buying a better bottle and enjoying (some of) the rest with dinner. It ain't smoked beetroot with feta blini, but then again, this ain't Masterchef.

If you're looking for other ideas for that leftover goat cheese, try this cool food and cooking resource Foodista. Super-useful!

Soft Goat Cheese on Foodista

Sunday, May 17, 2009

Cure for Sunday afternoon Autumn melancholy: Pear and Hazelnut Torta

Autumn Sunday mornings in Melbourne often begin a bit like the opening credits of Douglas Sirk’s 1955 film, All That Heaven Allows, I think. All red and yellow leaves and a gentle wind that stirs them like a warning for what lies ahead. Soft light makes everything glow like Technicolour and the whole scene is so lovely, that if you look for too long your chest begins to feel heavy with the weight of doomed romance or winter’s coming. What you need then, is something to eat that celebrates Autumn. Something wholesome and golden that reminds you how good the present moment can be.


Something with pears, perhaps? This little cure for Autumn melancholy is made from a recipe in this month’s delicious. magazine that I bookmarked right away. And it is everything I wanted it to be on that sort of a Sunday afternoon; it is a toothsome and nutty tart with hits of fragrant roasted pear scattered about on top. Something magic happens to it in the oven and the batter separates into a spongy, cake-like layer on the bottom and a chewy frangipane-like top layer. It comes out looking as if you’ve done something fancy – or time consuming, at the very least. It is shallow and not too sweet and would be delicious with a dollop of mascarpone, although I loved it warm on it’s own with coffee. A piece of this and a bit of Nina Simone on the stereo will sweeten your Autumn Sunday afternoon.


Pear and hazelnut torta
Serves 6

Note: to toast and remove skins from hazelnuts, place on an oven tray and roast for around 10 minutes or until they smell good and toasty. Be careful though – they burn real quick! While hot, put into a clean tea towel and rub vigorously until skins have been removed.


100g toasted hazelnuts with skins removed
½ cup (110g) caster sugar, plus 2 tsp extra to top
1/3 cup (50g) plain flour
½ tsp baking powder
pinch of salt
2 eggs
¼ cup (60ml) milk
1 tsp vanilla extract
80g unsalted butter, melted & cooled
20g extra butter, chilled and chopped
2 ripe but firm pears
icing sugar, to dust

Preheat oven to 170°C (or 190° in my slow old thing). Grease a 26sm round tart pan or quiche dish.

Place hazelnuts, caster sugar and 1 tablespoon of flour in food processor and whiz until the nuts are ground. Stop before they become too fine and form a paste. Tip this mixture into a large bowl. Sift in remaining flour, baking powder and salt. Whisk until thoroughly combined.

In a separate bowl, whisk eggs until slightly frothy, then add milk, vanilla and cooled butter, whisking to combine. Pour this into the dry ingredients and stir with a rubber spatula until well combined. The mixture might be runnier than what you’d expect of a regular cake batter. Scrape this into your prepared pan.

Peel, quarter and core pears then cut each quarter into 3 or 4 thin slices. If you’re neat and fussy, fan these by pressing gently on the quarter and transfer with a palette knife to the top of the batter. If you’re like me (lazy), do the best you can using only your fingers until it looks a bit like the picture. Repeat for both pears. Sprinkle top of the torta with extra caster sugar, concentrating on the pear fans and finally, dot fruit with chilled chopped butter.

Bake for 25 – 30 minutes, or until tart is golden and has puffed slightly (mine took 5 minutes longer even). Transfer to a wire rack and sift over a good layer of icing sugar. Allow to cool to warm then add another finer layer of icing sugar. Serve warm with cream or marscapone or at room temperature with coffee.

Sunday, May 3, 2009

Twin Peaks Cherry Pie

On Friday night, four of us sat around my kitchen bench drinking and eating chilli and cornbread and laughing about that old adage ‘the way to a man’s heart is through his stomach’. We were laughing because it was something that parents and grandparents used to say – but then we were laughing because I said that I thought it was true.


It reminded me of my first crush. From the moment I laid my eyes on him, I knew that I’d have to master the Cherry Pie. I knew that without this skill – without this recipe – he’d never give someone like me the time of day. And even worse, I knew that I wasn’t the only the only one who felt this way about him. If I ever wanted Special Agent Dale Cooper to marry me, I’d have to be able to make a damn good cherry pie. And on Friday night, after the chili and more wine, we realised that I’d finally done it. As it turns out, I may be a few years too late. Sigh. Anyway, I think the secret was the cherries.


To make a real Twin Peaks Cherry Pie, you need to use tart pie cherries, so on Friday morning I pulled out the super-rare morello cherries I’d bought from an old Polish woman in the summer at the farmer’s market. Now, unless you have a tree or a neighbour with a tree, these little darlings are pretty hard to come by. The day I brought them home, I diligently pit the whole lot and then flash froze them. They’d been in the freezer door and I’d look at them and think of Dale (not Kyle) every couple of days, waiting for the right moment. When it arrived, I made a quart of David Lebovitz’s amazing vanilla bean ice cream and turned on the oven. And everyone agreed that with this cherry pie, I could have won Special Agent Dale Cooper's heart. I suppose it might work on others, too.

Twin Peaks Cherry Pie
This 'should' serve eight people.

1 quantity of easy flaky pastry made with 2 tbsp caster sugar
Milk to glaze (rather than egg)

1 ¼ cup sugar
3 tbsp arrowroot powder (tapioca flour)
2 tbsp corn flour (corn starch)
1 tsp cinnamon
5 – 6 cups of fresh, frozen (not thawed) or tinned (and drained) morello cherries
1 tsp vanilla essence
½ tsp almond essence

Make pastry, halve, wrap in plastic and pop in the fridge to chill for at least one hour (even two).

About 30 minutes before baking, add sugar, arrowroot, corn flour and cinnamon to a large bowl and whisk to combine. Add cherries and essences and turn until well coated with sugar mixture. Set aside for 20 – 30 minutes.

For an easier-to-handle lattice top, roll out top pastry and cut neatly into strips. Use a ruler if you like precision: usually I can’t be bothered. Pop these strips onto a baking paper-lined oven tray and into the freezer for 20 minutes or so. They’ll be easier to handle and weave when they’re firm!

When ready to bake, roll remaining disk of pastry to fit a standard sized pie plate. Trim, leaving a 1cm overhang. Pour in cherries and scrape in all the sugar mixture – this will make your sauce! Carefully arrange firm pastry strips in a lattice weave over the top of the pie. Leave it to rest and soften for a few minutes.

When softened, gently press the strips into the edge and turn under, as for a regular pie. You can then shape the edge to the design you like best, or simply crimp with a fork. Brush with milk and pop into oven. Bake at 220C for 30 minutes then cover edges with foil to prevent burning. Return to oven, turn down to 200C and bake until pie is golden – around 30 minutes (in my terrible oven).

Remove and set aside for around 30 minutes. I know it’s tempting, but if you cut a slice right away it will fall apart! Trust me. Serve with vanilla ice cream or whipped cream.

Friday, April 24, 2009

Braised Pork with Prunes

I've been so busy lately that I haven't even had time to tell you about this:


To be fair (on me), I have been busy organising this conference for the past few weeks. But now that the B for BAD dust has settled there's no excuse to not get on with things in the kitchen. In fact, I've been dying to. Eating out lots - something that invariably happens when one is very busy - always takes its toll on me. I can do it for a couple of days in a row, but then the effects of what must be so much more oil and sugar and salt in (even good) restaurant food start to kick in and I feel sluggish. Or maybe it's just that I can't help but order the duck every time. In any case, I need home-cookin' real bad.

Braised Pork with Prunes was the first recipe I tried from the 2009 reissue of Delia Smiths's Frugal Food (originally published 1976) and we've made it a number of times since already. The frugal thing is really a bonus; what makes me just about stamp my feet in excitement is how awesomely British the food is. I haven't got around to the Kipper Quiche or the Spiced Apple Shortcake yet, but you can bet I will. It is food that reminds a bit of my Australian grandmother, Mavis. It is British food before Jamie Oliver, but before the proliferation of take-away, too.


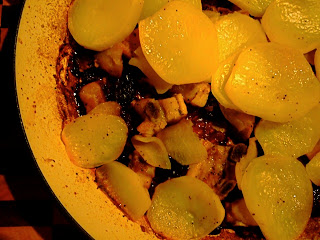
Despite the less-than-inspiring photographs this week, I promise that this is delicious - especially if you're the kind of person that usually orders the duck. It is sweet and sticky and rich and is a complete meal made entirely in one pot (not including the pan from the celeriac puree we served it with). And it is gold for those that love that heavenly coupling of dried fruit sweetness and slow-roasted meat. Gold. I've only changed the order in which things are done to minimise washing up - otherwise the recipe is entirely Delia's. Enjoy.

Braised Pork with Prunes
From Delia's Frugal Food. Serves 4

700g lean (or trimmed) belly pork or spare ribs, cut into cubes or pieces
1 tbsp olive oil
6 juniper berries, crushed
1/2 tsp fresh thyme, chopped (you could use dried)
225g brown onions, peeled and sliced
1 clove garlic, crushed
110g prunes, halved and pitted
1 large Granny Smith (or other cooking) apple, peeled, cored and sliced
A large pinch of caster sugar
700g potatoes, peeled and thickly sliced
Small knob of butter
150ml dry cider or white wine
salt and pepper

Preheat oven to 170°C/325°F.

Heat oil in an oven-proof casserole over medium heat and fry onion and garlic until softened. Remove and set aside. Fry pork pieces in same pot until browned. After arranging them fairly evenly, season and sprinkle over the juniper berries and thyme. Layer in the onions and tuck in the prune pieces here and there. Arrange the apple slices over this and sprinkle them ever so lightly with the caster sugar. Next layer over potato slices, overlapping and season. Dot butter here and there over potatoes and pour in the cider or wine. Cover and cook in oven for 1.5 hours. When cooking time is done, increase heat to 220°C/450°F and remove the lid from your pot. Pop back into the oven for around 20 minutes until everything looks delicious and golden. Voila.

Sunday, April 5, 2009

(Cheat's) Ricotta Cannoli

This week I learnt that even when things are so busy that you can't find time to do your washing, there's still enough time to make cannoli. Amazing, huh? So I thought I'd better share, pronto.


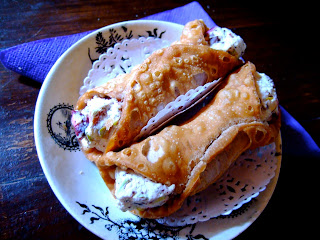
The trick is, of course, to buy ready-made cannoli shells from the Italian grocery store and pipe them full of a light mixture of fresh ricotta, chocolate, pistachios and dried sour cherries. This means that these delicious Italian afternoon coffee-time treats are ready in only ten minutes. I served them the other evening as the dessert course of a late Friday night supper and they were a perfectly light conclusion to a lovely evening of wine and small bites.

I love all kinds of cannoli (including those stuffed with chocolate Italian pastry cream), but the ricotta versions are genius, I think. You could make them without the cherries or use cranberries instead, or just use nuts and cinnamon. Just tailor them to your preference and you can't really go wrong. If you've got 15 minutes to spare, you're set: 10 minutes to make, 5 minutes to enjoy with a strong espresso. And then maybe you can put the washing on.

Note: For Melbourne readers, I bought these cannoli shells at Mediterranean Wholesalers on Sydney Rd, Brunswick (a must-visit if you've never been). They are made in Italy and come in a pack of 10 and keep well in an air-tight container. Otherwise, try Italian grocery stores and bakeries.

(Cheat's) Ricotta Cannoli

6 large ready-made cannoli shells

About 400g fresh ricotta
4 tbsp icing (confectioners) sugar
1 tsp vanilla extract
finely grated zest of one lemon
1/2 tsp ground cinnamon
50g chopped pistachio nuts
50g dark or bittersweet chocolate, chopped or grated
1/3 cup dried sour cherries, pitted and chopped

Break ricotta into a medium bowl and sift sugar over. Add vanilla, lemon zest and cinnamon and beat with a handheld electric beater until smooth and well combined. Fold in remaining ingredients.

Place mixture into a piping bag with a large nozzle (or a strong freezer bag with a corner cut off) and pipe into shells. Cannoli are ready but keep quite well for a day covered in the fridge.

Friday, March 27, 2009

Soft White Dinner Rolls

Finally things are getting back to normal around here after a few weeks of (what must have been) alien interference with our electrical appliances. What have I been doing all this time without my computer (and my hairdryer)? Why, I've been baking, of course!


I feel like a bit of a phony admitting this, but I'm pretty crap at making bread. Which is so sad! Especially when, one Autumn afternoon, you cook up a big pot of sweet butternut pumpkin soup and realise that nothing would go better with a big bowl than a warm, freshly baked dinner roll.

Funny, right? I mean: 'dinner roll'. I hadn't thought about them in years until we had lunch the other week at our wonderful local French restaurant Libertine and they served up the tiniest, most dense and delicious warm dinner rolls (with real French butter) and I remembered how great those little rolls could be. So elegant! And then I remembered a clipping I'd clipped many moons ago in which Nigella Lawson gave instructions for an easy milk-bread dinner roll that she promised anyone could make. And yes, my friends, I can confirm that anyone can make these delicious little...dinner rolls.


Okay, so I just like saying that. Dinner rolls. But really, these are wonderful - like something a country town bakery might make. Soft and super-white and torn open while still warm, all they need is a scrape of butter to become perfect. If you've got any left later on, they're brilliant with jam for breakfast. And if you've still got some left, you can freeze them to whip out at a moment's notice when friends drop by. And then you can show off because, yes - you baked your own bread.

Soft White Dinner Rolls
From Delicious. magazine

31/2 cups plain flour, plus extra for dusting
3 tsp dried instant yeast
1 tbs caster sugar
11/2 cups milk
25g unsalted butter

For topping:
1 egg, beaten
1 tbs milk
1 tbs sesame seeds

Combine flour with yeast, sugar and 1 tbsp of salt in a large mixing bowl.

Warm milk and butter over medium heat until butter begins to melt (around 2 minutes). Pour butter and milk mixture into dry ingredients and mix with a fork to make a rough dough. If it seems too sticky, add a little more flour. Using a machine with a dough hook or your hands, knead with until the dough is smooth and silky. This should take around 5 minutes.

Put the ball of dough into a greased bowl and turn to coat.. Cover with plastic wrap and leave in a warm place to rise for around 1 hour or until doubled in size.

Grease a baking sheet. Punch down the dough and turn out onto a floured surface. Pull off golf-ball sized pieces of dough and form into little balls, forming them into five rows of six rolls. Place them around 5mm apart on all sides to ensure that they meet once risen. Cover the rolls with a tea towel and leave to rise for 30 minutes. Meanwhile, preheat oven to 225 C.

When rolls have re-puffed, beat together egg, milk and a pinch of salt to make the glaze. Brush the rolls tops with this mixture and sprinkle tops with sesame seeds (or poppy, if you're so inclined). Bake the rolls for around 15 minutes until they are golden brown. Serve immediately or transfer to a wire rack to cool.

To freeze rolls (best done same day of baking) cool, double-wrap with cling film and pop into freezer.

Thursday, March 12, 2009

Best of Blogs: 5 recipes to make right now

Something terrible happened the other week: my hard drive died. I realise there are greater tragedies and evils in this world, but it has been so difficult letting go of all the old writing, photos from our trip to Mexico and pictures of my little cat, Quincy, when she (yes, she) was still a kitten. In my obsessive backing up of my PhD, I neglected all those other things I didn't think about every day that were nevertheless so important. Like the photo of enchilades with mole poblano I was going to blog about next.

But every so often we must start over - whether by choice or not. So here goes. Seeing as I'm short on photos this week, I thought I'd tell you about five of the recipes that have kept me afloat from over the past couple of weeks - recipes from some of my favorite blogs. I hope you'll enjoy them as much as I do.

And do let me know if there's a recipe out there that's inspired you recently; it's a nice thing to be able to share.

1. Thick, chewy oatmeal raisin cookies at Smitten Kitchen

These are so, so good. I took Deb's advice and flash froze a bag of these: they're especially good as a study snack.

2. Roasted broccoli with shrimp at The Wednesday Chef

If you've never roasted broccoli before, let this be your introduction. The vegetable takes on an utterly addictive texture and there's no easier way to prepare prawns and make sure they cook to perfection.

3. Sour cream apple pie at Posie Gets Cozy

This wonderful, delicious pie and sweet website was brought to my attention by the crazy and hilarious kids at the food paparazzi. It is easy and makes the house smell wholesome when you bake it - what more could you want?

4. End of winter carrot and raisin salad at Homesick Texan

I turned to this about two weeks ago when I felt like coleslaw but didn't have any cabbage. This salad is so much more than the sum of its parts; it is sweet and juicy and refreshing. I served it with roast chicken, but it was awesome the next day for work lunch, too.

5.Banana bread with cinnamon crumble topping at Orangette

Everyone knows about Molly Wizenberg's beautiful blog, Orangette - but here's a link in case you haven't tried her Banana bread with cinnamon crumble topping. It is moist and deeply flavoured and truely the best banana bread I've ever come across.

Sunday, February 22, 2009

Kolokithopita (Greek Cheese & Pumpkin Pie) & How to make (the best) Greek cheese pies

When we arrive in Greece, we always take a bus from the airport to the bus station that services the Peloponnese. The bus joins the chaos steaming along newly built highways and speeds past half-completed concrete buildings, through the industrial outskirts of Athens. From the other side of the bus window the chaotic momentum of this magnificent, sprawling, modern city begins already to weave its magic spell on your jet-lagged eyes, making them big and wet again. And then you pull into the big old bus station made of painted tin and it's a different world altogether. Gypsies and business men wait by suitcases and bundles of fabric, while priests read newspapers and old men sell lottery tickets. Old, old Greek music spills through crackling speakers at a volume they can't handle. And people sit down for something to eat before long journeys. I love this wait for all these reasons - and because I always buy a tiropita from the cafeteria.


It's one of the things I do to make sure I'm really there - because in Greece tiropita, or cheese pies, are everywhere. They're sold at stations, through shop windows on the street and in bakeries all over the country, and there are so many varieties that I've accepted I'll never be able to try them all. Outside of Greece, the most well-known seems to be spanakopita, the cheese and spinach pie - but I sometimes worry that it's become one of those dishes people make only when they have a vegetarian coming over. A good Greek cheese pie - let's start calling them pita - should be something everybody loves, something perfect to take to parties, barbecues and to have for dinner with a salad.

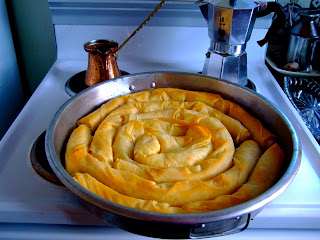
This is also a recipe request from my darling friend Yardena who wants the recipe for spanakopita. Instead, I made a kolokithopita (cheese and pumpkin), but have included instructions for turning this into a number of Greek cheese pie delights. And I've also included photos and instructions on how to make Greek cheese pies village-styles, because whenever I make them like this, people swoon. For some reason, many people are scared of using filo pastry. Which is a damn shame because it always seems to me to be the easiest to handle of any kind. In fact, the whole dish is superbly simple and can be thrown together in very little time.


In Greece when you buy tiropita or spanakopita they're often hand-sized and made with flaky pastry, which contrasts wonderfully with the salty, creamy filling. At home, they're usually made with filo like mine below - for this style filo is best. I've used a non-commercial filo that I buy from a Turkish grocery store - you'll see that it's a little thicker and easier to deal with. It also goes wonderfully crispy when brushed with butter and baked. Try Middle Eastern food stores and continental delicatessens, but if you can't find it, just use the commercial variety and adhere two sheets together by brushing with butter to make a thicker piece.

The pumpkin pita has everything that is excellent about the cheese pita, with the sweetness of the pumpkin to contrast with the salty creamy filling. You simply grate the pumpkin into the cheese mixture raw and it cooks inside the pie, lending moisture and lightness without ever becoming soggy. The ricotta, with the help of an egg, sets the filling just firm, and the best thing about making it into a round whirligig is that this spiral of sweet and salty cheese and pumpkin is encased in layer upon layer of thin, crispy casing. To take it to the next level, add a grating of nutmeg and a swirl of good honey to the filling. Trust me, everyone will ask you for the recipe.

Kolokithopita (Greek cheese and Pumpkin Pie)
Note: the amount of pastry (and filling) will depend on the size of your tin or tray. To make spanakopita (spinach and cheese pie), substitute the pumpkin for a bunch of spinach, wilted, strained and finely chopped. Instead of honey nutmeg, use some dill or fennel fronds. For tiropita (plain cheese pie), increase the ricotta and feta by 100g of each. I leave the nutmeg and honey in, but do as you please!

100g butter melted
3 large round sheets of handmade filo pastry, halved or around 12 sheets of commercial filo pastry

For filling:
500g fresh ricotta
400g feta (goat or sheep milk is best)
1 egg
350g pumpkin, grated
a grating of nutmeg
1 tbsp honey
salt & pepper

Preheat oven to 180ºC/350ºF.

Crumble ricotta and feta into a mixing bowl. Add egg, nutmeg and honey, then mash and mix up with a fork until combined. Add grated pumpkin and season with salt and pepper, remembering that the feta is salty. Mix with fork.

Brush tin or tray with melted butter to grease.

Spread pastry out and brush all over with melted butter. If using commercial filo, join two sheets with butter and use as one. Spoon filling along one long edge of pastry almost to the edges. Fold in edges, then roll the pastry away from you to form a tube. Fit into tin, bending gently to curve. Repeat until the spiral is complete. You should have some butter remaining - use this to brush over the top of the pie generously.

Pop into oven for 40 - 50 minutes or until golden brown. In a rental property oven (like mine), you may need to turn the pie halfway through cooking and/or leave it in a little longer. Cut into wedges and serve straight from the pan.

Sunday, February 15, 2009

Mussels with Loukanika and Saffron

About an hour and half drive from Melbourne, along the Bellarine Peninsula, there's this little place called Portarlington. We love it there. It's not the fanciest place to visit, or the most idyllic beach you'll ever come to, but this small town has something calming about it - a slower sense of time passing. It's the kind of place that is still dominated by summer houses built in the 1950s and has parks with big old trees and electric barbecues right behind the sand. There's a couple of small bakeries and a mini-supermarket and a pub and there's an excellent fish and chip shop that serves South Melbourne Market dim sims. And on the end of their pier you can buy fresh mussels right off the boat for very, very cheap.


A big bowl of steaming hot mussels is so impressive; it always seems to me like a seafood banquet we somehow acquire, fortuitously, for only $10. But really, they're always that price and they're so easy to cook. You can poke them into a paella-like rice dish right at the end, pop on the lid and let them steam until they open, or smoke them on a barbecue like Jamie did in his Jamie at Home series. I like them best simply steamed with a fragrant, white wine broth that you can tailor to whatever you feel like or have on hand. And, lucky for us, loukanika is what I had on hand last week when we got back from Portarlington.

Loukanika is a Greek sausage that is used a lot like a chorizo, although it is typically flavoured with wine, orange or leeks. They're delicious sliced and fried with a squeeze of lemon served as a meze, or sliced into a pan and browned before adding beaten eggs to make a heart-stopping/heart-winning scramble. Here, a spicy orange loukanika is sliced and fried, before adding chopped onion, garlic and fresh tomato to make a robust and heady base for the mussels. The whole sticky lot is then deglazed with dry white wine and a good pinch of saffron, delicate and luxurious, is thrown in to bring the whole lot together. After this, it is simply a matter of throwing in the scrubbed mussels, giving the whole lot a big stir and popping on the lid until the shells open and release their delicious sea juices. In winter you could serve this with potatoes, roasted or mashed, but in summer I like a big piece of toasted sour dough to mop up all that flavour.

Mussels with Loukanika and Saffron
1kg fresh mussels
1 tbsp olive oil
1 Greek loukanika sausage, sliced
1 medium white onion, chopped
1 large garlic clove, chopped finely
2 large tomatoes
1/2 cup white wine
3/4 cup fish stock, or vegetable stock
A good pinch of saffron threads
A good handful of continental parsley, roughly chopped

At least an hour before cooking, pour mussels into a bowl or sink of cold water to soak and release any sand or grit. When ready to begin, scrub mussels with a stiff brush and if necessary, debeard. For detailed instructions on preparing mussels, look here.

To peel tomatoes, cut a small X into the base of each fruit and put into a bowl. Pour over boiling water until covered and leave to stand for a few minutes. Drain and when cool enough to handle, peel. Skins should slide off easily. Chop peeled tomatoes into a rough dice, reserving juices.

Heat the olive oil on medium heat in a pot large enough to hold all the mussels. Add sliced loukanika and fry until crispy and golden on both sides. Remove from pot, set aside and fry onions in all the goodness from the sausages until they become soft and a bit sticky (turn down the heat if they seem to be cooking too quickly). Add garlic and fry for a minute or so. Add chopped, peeled tomatoes and juices, stirring to combine. Fry for around 5 minutes until the mixture thickens, then add wine. As it bubbles up, scrape the bottom of the pan with your spoon to collect all the brown goodness. Put the loukanika back in and add the stock. Pop the lid on, turn the heat up slightly and let the whole lot come to a boil. Taste for salt, remembering that the mussel shells will impart a sea water saltiness - I usually leave salt out.

When the pot seems excited and ready, add the drained mussels and give the whole lot a big stir. Replace the lid and steam for about 8 minutes. Give the pot a good shake a couple of times to give all the mussels a chance! Take a peek - they're ready when open. If not, give them a few extra minutes. When ready, ladle into bowls with some of the juices. Add parsley to each.

Wednesday, February 4, 2009

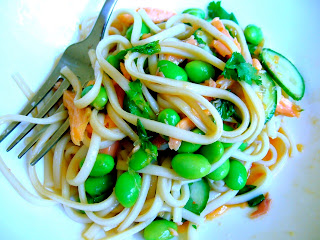
Smoked Trout, Edamame and Udon Salad

I'd be the last person, usually, to order that ubiquitous 'Asian' salad found just about anywhere these days. Heavy noodles, over or undercooked vegetables and defrosted prawns just isn't my thing. But after my successful frozen pudding experiment last night (where I proved that frozen gingerbread pudding from Christmas could be thawed, sliced and fried in a little butter and served with custard) - we felt like something a little lighter for lunch.


With half a smoked trout in the fridge, I knew it had to be salad. And then my 2009 promise to actually use all those things in the pantry yielded a packet of organic udon noodles. Something came over me; I suddenly felt that a delicious noodle salad was actually possible and that there was nothing I wanted to eat more. So I came up with this. It made me remember that throwing things together without planning and recipes often yields the best and most surprising dishes.

This is very, very simple, but fresh, cool and light for a hot summer's day (and the Lord knows that we've been enduring very hot days). The noodles are cooked until al dente (can you say that for a noodle?) and combined with some thawed edamame (soy beans), cold, crisp cucumber and the flaked smoked trout. Add chopped mint and coriander, then the whole lot is tossed with a dressing of soy, mirin and fresh ginger and served cold. Very refreshing. This makes a good lunch for two, but can be adjusted very easily to make more or less.

Smoked Trout, Edamame and Udon Salad

2 bundles (or 1 per person) of dried Japanese udon noodles
2 handfuls frozen, cooked edamame (Japanese soy beans in pod), thawed and de-poded
1 larger Lebanese cucumber, halved and sliced
About half a whole smoked trout, skin removed, flesh flaked
Handful each of coriander and mint, roughly chopped

For dressing:
2 tsp Japanese soy
2 tsp mirin (cooking wine)
a tiny dash of sesame oil
1 tsp sweet chilli sauce
3 tsp freshly squeezed lime juice
1 knob of freshly grated ginger (more or less to taste)

Cook noodles according to packet directions. Drain and refresh with cold water. Add to bowl with all other ingredients.

For dressing, combine and whisk all ingredients with fork. Pour over salad and toss gently.

Serve at room temperature, or cold from the fridge.

Tuesday, January 27, 2009

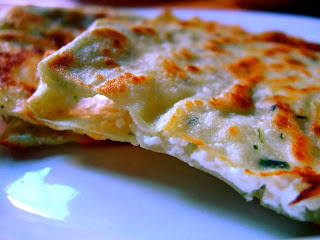
Crispy Roti with Feta

This is hardly a recipe - but it is such a great idea. An unlikely combination only in terms of each ingredient's cultural affiliation; flaky Indian roti bread and creamy Greek feta cheese. But I came up with this idea because it reminds me of handmade pita bread fried in olive oil that my grandmother used to make. You used it to scoop up a coarsely mashed paste of feta and oregano and it was the most delicious thing that ever came out of a frying pan.


This is great for when it is too hot to (really) cook but you need something a little more than salad, or when you want a little something to serve as a meze or finger food. And it is so perfect for during the party season when you get home very late, after many drinks and remember that you've not eaten dinner. For me, crispy roti with feta trumps the after-midnight post-cocktail toastie - and I think that says alot.

To make, use any roti you like - I usually have spinach. Carefully pry open and unfold a sheet of the bread, trying not to break it at the creases. Crumble a generous amount of feta over the newly revealed centre. Sometimes I also add a sprinkle of dried Greek oregano at this point. Fold the sides back over and press gently to adhere the roti back together. Fry in the bread in a large non-stick frying pan over medium heat until puffed and golden. To serve, cut into squares or fingers.

Lazy, huh?

I've just set up a recipe index for this site, which should make it easier to access recipes past. Links to it are here, and in the site side bar. Enjoy!

Tuesday, January 20, 2009

My inner Italian-American: Spaghetti and Meatballs

I’m not sure I’ve ever mentioned this, but desire in my life is dictated almost entirely by cinema. From a very, very young age, my ideas about the world – and what I wanted it to be – were constituted through films I saw at the movies and watching videos at home. I think that, as a consequence of this, the world for me was relatively unbound by limitations of class and sexuality and nation and gender; I dreamt up who I was and, more particularly, who I wanted to be – with cinema as my reference.


As a little kid, the Frog brothers taught me all about what to do if you met a vampire at the fair, and Frankenfurter showed me that sometimes men wear lipstick, too. When I was eleven, I learnt from Stanley Kubrick how terrifying things can also be beautiful, and I often wondered if my school had an attic where I could lock myself in to read incredible books and eat my sandwich slowly. I wanted to visit OZ for a lunch pail picked from a tree and Chicago for four fried chickens and a coke. But there was nothing I wanted more than to stand by the stove in that kitchen when Peter Clemenza teaches Mikey to make spaghetti sauce in The Godfather (1972).

This moment marked for me the beginning of a deep fascination with Italian-American culture – an obsession that I’ve fostered entirely through film and television. This monster reached its crescendo in my late teens, when I decided to shelve my dreams of an academic career to fulfil my new life’s calling to marry into the mob. I had leopard print, too much mascara and names picked out for my boys, Frankie and Johnny. And I had this recipe.


Spaghetti and meatballs is not something found on Italian menus in Australia – even though we have wonderful regional Italian food here. This is because, while it surely has some southern Italian root, it is known specifically as an Italian-American speciality dish – something that was made by those who’d left the old country for the new. Perhaps because I’d never eaten it, I became obsessed with this huge platter of comfort food that was produced time and time again in American family dinner table scenes. The desires of my inner Italian-American are what led me to this dish – and I’d never have met her without the cinema.

Life as a mob wife would have ensured that mountains of coiled al dente pasta, red sauce and soft, rich meatballs appeared regularly on my table, but somewhere along the line, I changed my mind. Funny, but I think one of the turning points was seeing a film called Frankie and Johnny (1991). From this film, I learnt how standing around, brushing your teeth could be romantic and that having someone make you tuna fish sandwiches can somehow trump a diamond necklace.

Just recently, I’ve had the pleasure of re-watching a number of the greatest gangster films while I’m doing some writing for a forthcoming book on the genre and that wonderful scene in The Godfather – that scene that is about so much more than spaghetti – seeing it fanned the embers of that old desire. I made spaghetti and meatballs and we sat down to complete the trilogy and when the film was over and the last of the sauce wiped out of the bowls with thick buttered bread, I thanked the cinema for its ability to both summon and satisfy desire.

Note: If Italian-American food is your thing, I’d highly recommend the January 2009 issue of American magazine Gourmet which takes this cuisine as its central theme. It contributed a number of ideas for excellent tweaks to my original recipe. Additionally, it contains a beautiful and honest essay by Amy Bloom about discovering Italian food, coincidentally (I promise) called ‘My Inner Italy’. Highly recommended.

Spaghetti and Meatballs
Adapted from Gourmet 2009 & Peter Clemenza’s original recipe
This makes enough for about six serves. Or two dinners and four meatball sandwiches. You know, like in Point Break.


For the sauce:
2 cans Italian tinned tomatoes
2 garlic cloves, peeled and squashed a bit
¼ cup olive oil

For the meatballs:
1 medium onion, very finely chopped
2 garlic cloves, peeled and finely chopped
1 cup day-old bread, torn into pieces
1 cup milk
2 eggs
¾ cup grated Italian parmesan (I used Grana Padano)
a couple of springs each of fresh parsley and oregano, leaves finely chopped
250g veal mince
250g pork mince
250g beef mince
vegetable or olive oil, to fry

Spaghetti, around 100 – 120g dried per person

To make the sauce, tip tomatoes and juice into a large bowl. With your hands, squeeze and break up the tomatoes to make a chunky puree. Heat olive oil on medium in a heavy-bottomed saucepan and add squashed garlic. Cook for a couple of minutes to release the garlic flavour into the oil. When it smells very good, add the tomatoes and juice. Add salt and pepper, stir and bring to boil. Turn down to a low simmer and let cook, for around 30 minutes, while you make the meatballs. You can remove the garlic after cooking if you like.

For the meatballs, pour milk over torn bread and let sit five minutes. Meanwhile, fry chopped onion in a frying pan with a little olive oil and a tiny sprinkle of salt until softened, about 8 minutes. Add garlic and cook for a few minutes more. Remove from heat and scrape into a large bowl to cool. Remove bread and discard excess milk. Work the bread between your fingers until you have a slightly chunky pulp. Add this to the cooled onions, along with the herbs, parmesan and eggs. Add salt and pepper, remembering that the cheese is slightly salty and mix together until well combined. Add the minced meats and, with light hands, combine gently without needing or overworking the mixture. Make mixture into meatballs with dampened hands (mine are about the size of small limes) and place on the baking paper lined tray until all are made. Heat olive oil in a large frying pan over medium heat and fry meatballs in batches until browned on the surface.

When all meatballs are done, taste sauce for seasoning, then add meatballs and combine very gently, being careful not to break them up. Simmer gently until the meatballs are cooked through – this should take around 20 minutes.

Cook pasta according to packet directions in plenty of salted water. When ready, drain and add to sauce, tossing gently to combine. Serve with extra grated parmesan.

Monday, January 12, 2009

Mackerel Two Ways: Butterflied Baked with Garlic and Paprika & Escabeche

At our house, we have a real thing for cheap kinds of fish like sardines and mackerel. It isn't because they're cheap that we love them, (although this ensures the love affair continues) but because, with a little bit of an idea about how to prepare these babies, they're often the tastiest, meatiest and healthiest fish you could ever eat. 


The Spaniards, Portuguese, Greeks and Italians know a lot about cooking these kinds of fish so there are countless tasty ways to prepare them. The texture is meaty and pleasantly oily and the flavour stronger than with your average white fish. Don't be put off though by your experience of the canned variety, because fresh fish is always a different kettle of, fish. Fresh mackerel is not something we find everyday here though, so when I saw them at the market the other day, I snapped up a couple of kilos (for under $12!) and decided that I'd prepare them two ways. Believe it or not, I cleaned, butterflied and filleted these myself, but I'm a sucker for learning about these kinds of things and if you've got a fish monger that is friendly, I'm sure they can take care of this for you. If you're feeling crazy, here are some good instructions for cleaning, and here are some for the rest. Go YouTube! Really, you can learn to do anything

The first lot we ate for lunch on the day I bought them (so fresh!), butterflied and baked very quickly, then dressed with extra virgin olive oil, finely chopped garlic, parsley and a generous sprinkle of Spanish smoked sweet paprika. With a delicious crunchy kind-of Greek salad and great bread for juices, it was delicious. If you're into these kinds of flavours - Spanish/Moorish/Middle Eastern - I can't recommend highly enough Sam and Samantha Clarke's book Moro, from which I stole this idea. It is one of the cookbooks I use most often. 


The second preparation, escabeche, is entirely different, in that the fish is gently pickled or marinated overnight in the refrigerator and served cold or at room temperature. The recipe was adapted (very slightly) from Frank Camorra's book Movida - a book that shares some of the  secrets of my favorite Melbourne restaurant. Note that owning this book, and even cooking from it, will not cure you of insane desire to eat there, all the time. But the fish - it keeps for a few days wrapped in the fridge: we pulled it out as a little tapa before dinner or light lunch over two or three days. The marinade made with wine and sherry vinegar, bay leaves and saffron is neither too vinegary or strong, but is deeply fragrant and kind of refreshing. It is a perfect dish for summer. 


In case you needed another reason to head to the market, mackerel is really a super-fish: it has lots of omega-3 (good fats) and vitamin B12 - good for your skin and just about everything else. Sometimes, at this time of the year (just after Christmas), those promises of healthfulness really get to me. But this, I'd eat anyway.  

Butterflied Baked Mackerel with Paprika and Garlic
From Sam and Sam Clarke's Moro
Serves 4 as a light lunch or first course. 
Notes: this fish could also be cooked on in a grill pan or or heavy frying pan. Also, a good substitute for mackerel here would be fresh, fat sardines.

3 tbsp olive oil
4 mackerel, cleaned and butterflied
3 small or 2 large garlic cloves, very finely chopped
A big handful of fresh parsley, chopped
2 tsp sweet smoked Spanish paprika (ahumado)
1 lemon
salt and pepper

Take a roasting tray big enough to hold your fish and pop it in the oven, while you preheat to 220˚C. When nice and hot, carefully pull it out and drizzle half the oil into the hot tray. Slide in the fish, skin side down (it will sizzle and begin to crisp up right away) and pop back in the oven for about 10 minutes, or until cooked through. 

Remove from the oven and immediately sprinkle with garlic, parsley and paprika. Drizzle with remaining olive oil and serve. So easy!

Mackerel Escabeche
Adapted from Frank Camora's Movida
Note: this could also be made with fresh, fat sardines

For the fish:
Around half a kilo of mackerel fillets
seasoned plain flour (to coat fish)
olive oil to shallow fry fish
fine sea salt

For the escabeche:
2 red onions
60ml extra virgin olive oil
4 bay leaves, preferably fresh
2 garlic cloves, finely sliced
pinch of saffron threads
2 large-ish carrots, julienned
125ml white wine vinegar
125ml Spanish sherry vinegar
250ml white wine
1 tbsp black peppercorns
1 large handful of flat-leaf parsley, roughly chopped

To serve:
small handful of chopped continental parsley
extra olive oil to drizzle

Lightly coat fish fillets in seasoned flour. In a large frying pan, heat the olive oil and fry fillets until golden brown on both sides (Frank says around 3 minutes). Season each side with salt. Remove and drain on paper towel to absorb excess oil. 

To make the escabeche, cut onions into thinnish wedges. Heat olive oil into a heavy frying pan over low heat and add onion, bay leaves, garlic and saffron. Stir to combine, then cover and cook for around 15 minutes. The onions should not colour, but turn transluscent and sticky. Add the carrot, stir and cover again for another 15 minutes. When the carrot has slightly softened, add the vinegars, wine, peppercorns, 1 cup of water and 1 tsp of salt. Bring to a boil, then simmer until the marinade it fragrant and doesn't smell of alcohol - about 20 minutes. Remove from heat, cool and add parsley. 

Place fried fillets in a single layer in a large, non-metal dish (metal will react with marinade). Pour over the escabeche. Cover with plastic wrap and refrigerate overnight. Serve the fillets the following day with a spoonful or two of the marinade and some vegetables on each. Sprinkle with fresh parsley and drizzle with extra oil. 

Related Posts with Thumbnails